
This guide was written by Sasch,
Feedback is very welcome either via DMs or in the Monster Hunter Gathering Hub’s Switch Axe Channel.
Remember to take your time. Don’t compare yourself to others, don’t let anyone tell you how you can and can’t enjoy the game you paid for.
This guide does not exist to push a meta onto you, merely to guide those who are a little lost on their way to achieve measurable greatness.
Despite being a ginormous Weapon, the Switch Axe has a rather short reach, with relatively low mobility for chasing or dodging monsters.
Despite this rather heavy nerf compared to previous iterations of the weapon, it can more than make up for it with the new changes and additions to the moveset:
a frame 1 counter, several hyper armor moves, and a strong sword combo that allows for mid-combo repositioning.
Switch Axe as a weapon relies on tight positioning to perform at its best, and iframe hops and rolls in a pinch.
This Weapon is for you if you:
- Have the patience to learn from mistakes,
- want to improve as a player
- enjoy optimizing your gameplay around mostly 1 or 2 moves,
- enjoy big axes that are secretly just swords,
- love EXPLOSIONS, but hate shields.
The following is a list of the most commonly used moves:
Basic moves:
- Axe - Fade Slash: Backwards+ after any move that ends in axe
- Axe - Forward Overhead Slash/Axe: Forward Slash: Forward+
- Axe - Overhead Slash:
- Axe - Wild Swing:
- Axe - Offset Rising Slash: +
- Morph: after any attack, sword->axe, axe->sword only if you have gauge
- Dodgemorph: after any dodge
- Sword - Double Slash:
- Sword - Overhead Slash:
- Sword - Counter: +
- Sword - Overhead Forward Morph: Forward++
- Drawmorph: while sheathed
- Finishing/Zero Sum Discharge: +, then repeatedly
- Sheathe:
- Dodge:
- Focus Mode:
- Focus Strike (either mode): + on wound
- Slinger: (hold/toggle) + (sheathed); Focus mode () + (Weapon Drawn)
- Important Combos:
- Amp Combo (sword): Double Slash -> Heavenward ->
- Full Release Loop (sword): Full Release Slash -> Spiral Burst Slash -> Rising Double Slash ++ -> ->
- Triple Slash Loop (sword): Overhead Slash -> Rising Slash -> Rising Slash -> Triple Slash -> -> ->
- Rising Slash Combo (sword): Overhead Slash -> Rising Slash -> Rising Slash -> ->
- ZSD (sword): While amped: Hold +, then mash while attached
- Sword Gauge Combo (Axe): Overhead Slash (axe) -> Side Slash -> Spiral Burst Slash -> ->
- Wild Morph: Wild Swing -> Morph -> ->
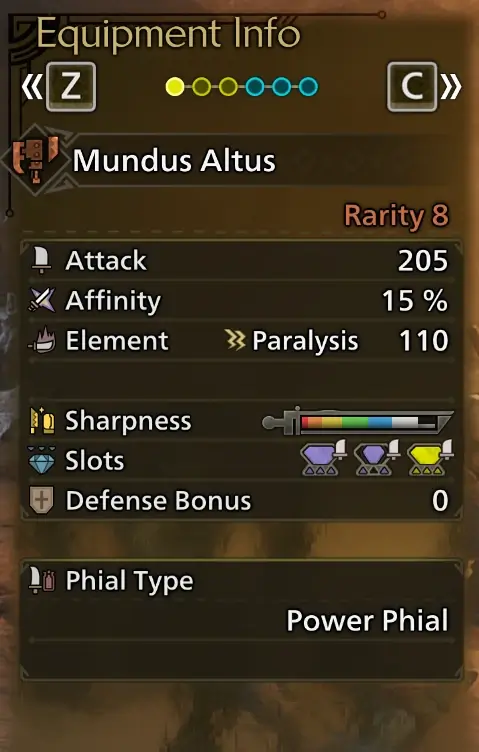 3.0A - Weapon Stats
- Attack: Important for all Playstyles, universal damage, usually referred to as Raw. Wilds, for the first time ever, lets us choose between Bloat and True values, the option for that is in Game Settings -> Page 3: Weapon Attack Power Display -> Display Without Coefficent. This Guide will only care about True Values.
- Sharpness: Acts as a modifier for Raw and Elemental Damage. Being a High Rank Game, every set will want to have white sharpness throughout the overwhelming majority of any given hunt. Unlike other Weapon types, Switch Axe does not have built-in sharpness reduction modifiers, every input consumes 1 unit of Sharpness. Due to the changes to the Skill System, sharpness skills compete with Critical Boost, which means that they don’t compete, making Sharpness Management a Player Skill instead of an Armor Skill.
| Sharpness | Raw Mod | Elemod |
|---|---|---|
| Purple | 1.39 | 1.25 |
| White | 1.32 | 1.15 |
| Blue | 1.2 | 1.0625 |
| Green | 1.05 | 1 |
| Yellow | 1 | 0.75 |
| Orange | 0.75 | 0.5 |
| Red | 0.5 | 0.25 |
| Fig 3.0B - Sharpness Table | ||
- Element: Status and Element is listed here if applicable, depending on the specific set you aim for, all of these can be important, or they can not matter. Note that Raw and Element have different playstyles in Wilds.
- Affinity: Every important Move in Swaxe’s kit is able to crit, making it the singular strongest stat in the current state of the game.
- Defense Bonus: Due to the nature of the Defense stat's scaling, any additional defense is unlikely to have an impact on damage received, making it a negligible Bonus at best. Safe to ignore.
- Slots: All maxed out weapons have either 3-2-1 or 3-3-1 slots. The exceptions are Artian weapons, which have 2-2-2 on the Rarity 6 and 7, and 3-3-3 on the rarity 8 Versions, always.
- Phial Type: These dictate the bonuses you get from hitting things in Sword Mode. Power Phials give a 17% boost to Raw and take the longest to Amp, Element Phials amp faster and grant +45% to Element/Status.
These two are usually recommended;
Poison, Paralysis and Dragon phials give Poison, Paralysis Status and Dragon Element in Sword Mode, respectively. These are only worth using if the remaining stats on the Weapon blow everything else out of the water. This is not the case in Wilds. Exhaust Phials give Sword Attacks the ability to KO monsters by hitting their head, and drain their stamina, so that they enter their ExhaustedDrooling state faster.
Switch Axe revolves around two main mechanics: Amp and the Sword Gauge. Morphing into Sword, or attacking in Sword mode, consumes Sword Gauge, while Morphing into Axe, obtaining Amped State and hitting monsters in Axe mode generates Sword Gauge.
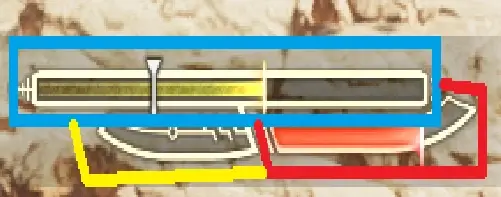 Fig. 4.0A - Sword Gauge, Power Axe Indicator, Amp Meter
 Fig. 4.0B - Full Gauge(s)
Hitting a monster while Amped generates a small explosion, referred to as a Phial Tick. They attach to the hitzone the monster was hit at.
Being amped also unlocks Zero Sum Discharge and, most importantly, Full Release Slash.
Power Axe boosts your raw for Axe Attacks only, by 10 flat. Power Axe is activated after using Heavy Slam. While Axe is stronger than in previous games, it’s still significantly weaker than Sword, which is significantly weaker than Full Release.
Focus Mode/Strike
Like all other weapons, we can enter Focus Mode with , and press for a small hit. If it hits a wound as shown on the left, it unleashes a strong multi-hit attack. You can morph up to twice during this onslaught. If you end in Axe Mode, it finishes with a weaker Heavy Slam, which still grants Power Axe buff. Sword on the other hand ignores your gauge and forces you into sword, gives a reasonable amount of amp, deals about 50% more damage than axe, and ends on a discharge, which itself can be followed up by Full Release Slash.
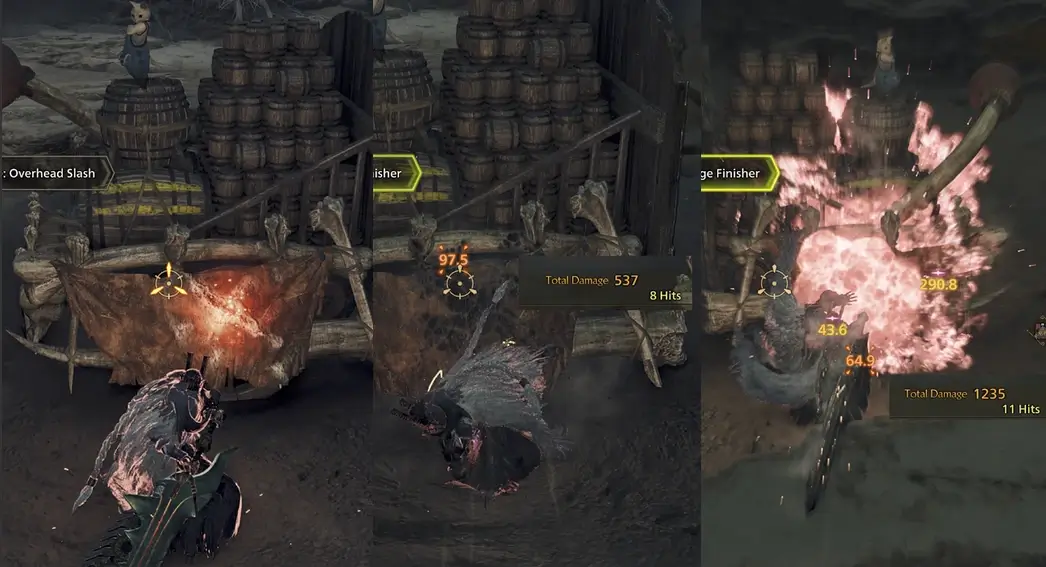 Fig. 4.0C - Focus Strike Comparison
Another big addition was the Frenzy Mantle, which acts similar to Frontier’s Fencing+2 skill, in that it gives some Attacks a second, weaker, hit. For Swaxe, it applies those after the Light Attack Combos in either mode, so during the Spiral Burst Slash and, notably, the Rising Slash combos.
Due to Mantle timers not resetting on either Quest End nor Quest Start, this will go largely ignored for the sake of this Guide, as it is likely to be relegated to Speedruns only. Sneak Attack
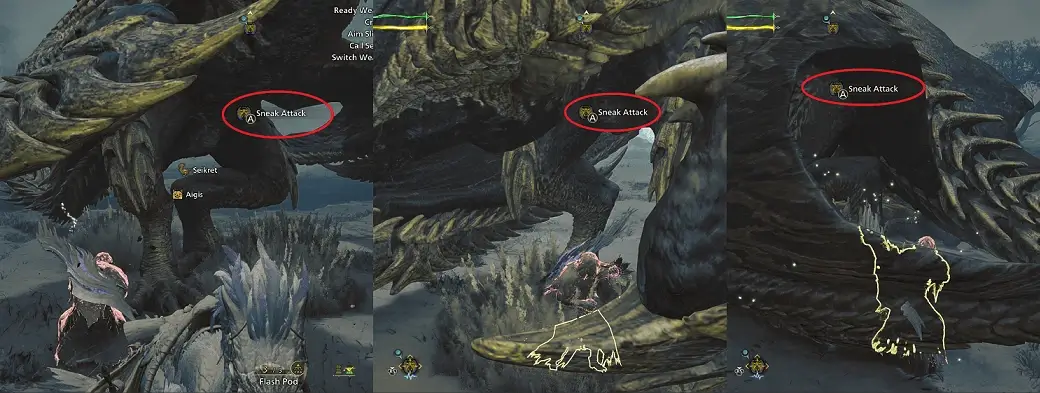 Fig. 4.0D - Sneak Attack
While a monster has not spotted you and is not engaged in combat and grounded, you can approach it and follow the button prompt () to use Sneak Attack, a reasonably strong attack that also grants the Power Axe Buff.
In order to fully convey the mechanics at play, the use of some clarifying and specialized Language is required - the Monster Hunter Lingo.
The formula for damage in Wilds is:
The first big step for Swaxe numbers is understanding where Phials apply. While in Rise, they were a post modifier, i.e. apply where Sharpness etc applies, in Wilds they have been nerfed to a standard % modifier.
Additionally, numbers like 5% don’t actually mean 5%. Used instead are floating numbers, long decimals that when rounded turn out to be the number advertised.
Wilds introduced some Skills that are outwardly similar to Sunbreak’s Powder Mantle, where every once in a while, there will be a Pop for Damage. While they do share the Internal Cooldown mechanism of PM, they often have further restrictions.
The important, playstyle defining moves we have in Wilds are:
The Full Release Loop consists of:
Rising Slash Loop consists of:
After Rising Slash Left, you can either repeat the combo, or Loop off into either:
Framecount was done by hand, by recording stable 60 fps footage of comboing on the training dummy and counting the number of frames, starting on the frame before the Input showed up in the UI, ending on the last frame before the next moves input showed up, and thus include Hitlag to be a more accurate representation. All other moves can be found and read in the Calculator, linked on the Endgame Guide, Section 9, Resources.
((Base Raw x % Modifiers) + Flat raw) x Raw Sharpness Mod x (HZV/100) x (MV/100) x (Crit modifier x Chance)
+
((Base Element x % Modifiers) + Flat ele) x Ele Sharpness Mod x (eHZV/100) x elemod x (Crit Ele x Chance)
Secondly, some moves scale with sharpness, and others don’t - the easiest example of this are Gunlance Shells.
There are several separate instances of rounding and flooring, which further complicates accuracy.
The 5% mentioned previously in in-game calculation is actually 4.99999523162841796875% (actual number). Display Raw (in the status menu) is Floored (rounded down). This leads to 200 Raw + 5% actually showing as 209. With the addition of Phials to the Group of Base mods (but possibly even before that), the Status Screen is unreliable and not used in Damage Calculation.
Flayer’s proc can only activate if a part has not been wounded for a certain amount of time and is currently not wounded. Scorcher and Whiteflame behave similarly, on a 3 second internal cooldown, and otherwise RNG. While testing, the longest time I’ve seen for either of them was 14 seconds, the fastest being exactly 3. WF and Scorcher don’t have the same proc chance (from testing), and WF overwrites Scorchers chance.
Element Convert works on a threshold basis, which is either Monster or Rank dependent. The formula for it would be ((Flat component + (Dragon component x (Dragon eHZV/100))) x (Raw Damage/Threshold)) x Uptime, for an average “over the course of the hunt” calculation.
Specifically Flayer, and possibly more skills, don’t proc on certain Attacks - Wild Swing in particular. They do proc on all important moves though.
Rising Slash, Triple Slash, Morph Double Swing (Sword -> Axe), and Full Release.
Full Release Swing 1, 3x Phial Tick 1, Full Release Swing 2, 5x Phial Tick, Spiral Rising Slash 1, Spiral Rising Slash 2, “Axe Double Morph Swing” 1, Phial Tick, “SwordDouble Morph Swing” 2, Phial Tick.
This loop has 506 526 MV, 9.5 elemod and every component of it can crit. It takes about 9.63 Seconds to do.
Overhead Slash, Phial Tick, Rising Slash Right, Phial Tick, Rising Slash Left, Phial Tick.
By itself, this amounts to 159 196 MV and 4.05 elemod (as of TU4). It takes about 3.3 Seconds to complete.
Triple Slash, for 258 305 Total MV, 8.1 Total elemod, and a total Duration of about 5.42 Seconds,
Or
Morph Double Swing, which adds Sword: Morph Double Slash 1 and 2, for a total of 239 296 MV and 6.05 elemod, for a total Duration of either 5.02 (RM3), 5.18 (RM2), 5.35 (RM1), or 5.38 (RM0) Seconds.
Exhaust Phials, while in Sword Mode and while hitting heads, deal 5 KO damage.
Status works based on Thresholds and Buildup. By default, attacks have a 10 in 30 Chance to deal their respective Status. This means that on average, the chance of dealing status is 33.333…%, but 10 out of 30 hits are hard coded, guaranteed, to proc it; at the same time, no more than 10 out of 30 can.
Upon reaching the status threshold, the status comes into effect proper. Dealt status before reaching the threshold also decays over time, meaning in order to actually inflict statuses, you need to consistently and constantly attack. Each time a status is inflicted successfully, the threshold rises, up to a certain max Value. Values of those thresholds, max thresholds and decay vary depending on Monster and can usually be found on Kiranico.
Switch Axe has one numerically superior playstyle, and 3 competitors for second place.
Rising Slash is the de-facto move to Spam.
Secondary options are, in order of strength on paper:
Full Release Slash, Triple Slash and Long Morph Loop,
All of which have slightly differing pros and cons.
Corrupted Mantle behaves largely similar to how Frontier’s Fencing+2 Skill works, namely that it provides a second hit - on some attacks. For Swaxe, the affected moves are the light attacks, namely Overhead/Rising Slash Combo and the Spiral Burst combo. With Corrupted Mantle active, Rising Slash beats Full Release (on paper), even after mantle nerf.
Utility Morphs: Dodgemorph You can perform a Morph from either sword mode after any dodge. The distance this covers has been nerfed compared to previous iterations.
Utility: Counter
Switch Axe gained a Counter in Sword Mode, which is active from Frame 1 and lasts roughly 1.5 seconds. Hitting this counter generates a lot of amp, and it can be followed up by Heavenward Slash.
Note: Perfect Counters generate more Amp than standard ones. To proc perfect counter, use it just as you’re about to get it. Normal counters give the character a slight blue hue, while Perfect Counters have a notable visual effect:
Fig 5.0A - Counter: Amp Generation, Comparison Perfect vs Normal Counter
Utility Morphs: 360° Morphs
360° Morphs are useful for repositioning and re-angling yourself. After any Dodge, hold any direction and press morph; this works even outside of Focus Mode.
Fig. 5.0B - 360° Morph Showcase
This can be used for simple repositioning, but also aggressively to sneak in a few extra hits.
Axemode: Fade Slash Holding Backwards and pressing is the input for the Fade Slash. It can be chained to any move that ends in axe mode, including (but not limited to):
- Heavy Slam
- All Sword → Axe morphs
- Forward Slash
- Forward Overhead Slash
Fade Slash is a fast repositioning tool that’s easy to combo into, enabling positional dodges in conjunction with forward Axe → Sword morphs or Forward Overhead Slash.
ZSDZero Sum Discharge Using Elemental Discharge while Amped grants access to the Zero Sum Discharge, a very strong utility move that, similar to Rise/Sunbreak, will only end if the monster flies or digs to a different area, or you:
- Get stunned
- Get paralyzed/slept
- Die
- Manually abort it.
Spiral Burst Slash Combo
Spiral Burst Slash is the third hit of the “light” axe mode combo, aswell as a followup to several other moves, notably Full Release. Landing both hits generates a lot of sword gauge.
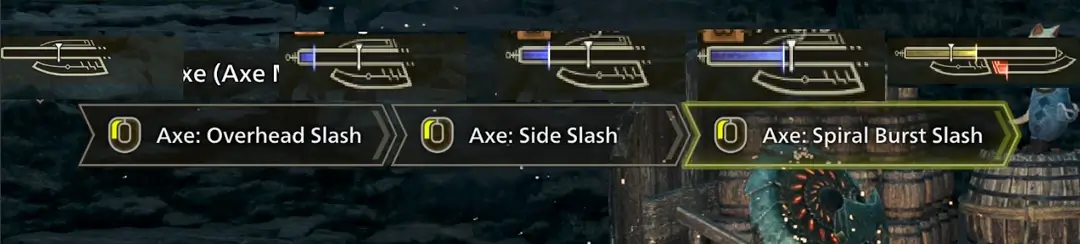 Fig. 5.0C - Sword Gauge RegenEmpty -> After Overhead -> After Side Slash -> After Spiral first hit -> After spiral Second hit
Rising Slash Loop
Rising Slash is the strongest loop for raw oriented Sets, and can reach absurd output if used in conjunction with Frenzy Mantle.
In Sword: Overhead Slash -> Rising Slash -> Rising Slash
-> ->
It’s simple, fast and can slightly reposition with every move of its combo, even without focus mode. Standing at 159 196 MV while amped (~448 ~60MV/s), it is our strongest non-full-release combo.
Full Release Slash Loop
The singular strongest raw-oriented combo in Swaxe’s kit.
Pretty much at will, while in sword mode:
Full Release Slash -> Spiral Burst Slash -> Axe: Morph Rising Double Slash -> Repeat
++, hold -> -> , repeat
The total loop stands at 506526 MV and 9.5 elemod total (~55 MV and 0.99 Elemod per second, respectively). It requires being in Sword Mode and Amped, and has a pretty long start-up, but from Frame 2 of the actual attack,
you gain hyper armor. Almost every other move used to be fluff and window dressing for Raw Sets focused on Full Release, but Rising Slash was buffed into dominance in TU4.
Note that it aims significantly farther to the right than the focus mode rectangle would make you believe, so adjust accordingly. Additionally, as of Title Update 1, Phial ticks no longer magnetize to the hitzone originally struck,
which means you’ll have to actually aim and understand where the swings pass through to get the most out of it.
Triple Slash Loop
Similar to the Rising Slash Loop, but it adds the triple slash at the end of it. This combo stands at 47.6 MV and 1.49 elemod 56.27 MV and 2.21 elemod per Second (for Ele Phials), making it the go-to choice for heavily elementally invested sets.
In Sword: Overhead Slash -> Rising Slash -> Rising Slash -> Triple Slash -> Repeat
-> -> ->
New Morph Loop
Wilds changed where the Double Axe Morph Swing is, from Double Slash to after any of the Rising Slashes. Unfortunately, in the absolute best case scenario, it’ll barely beat out Rising Slash and Triple Slash.
From Axe: Morph -> Rising Slash -> Morph -> Repeat
-> X ->
This combo can be extended by a second Rising Slash in Sword Mode, which makes it significantly stronger, but in its current iteration, it achieves Meme status at best, at least in terms of efficient playstyles. Hard requires Rapid Morph 3 to be worthwhile, despite its nerf from Risebreak.
This section will be short due to how new the game is.
Focus Strike:
Focus Strike can be used to force Sword Mode, which ultimately enables FRS with 0 Gauge.
Might Pill:
Might Pills now overwrite the Buff but not the timer of Might Seeds, meaning that if you take a seed and then a pill, after the pills 20 seconds are over, might seed applies again.
Counter Strike:
Countering, Hyper armoring and getting hit with knockback procs Counter Strike. At level 3, it gives 25 raw for 45 seconds.
- Inexperienced: Players who barely know the weapons moveset, having very little understanding of its mechanics and intricacies, having very little or no experience playing it at all.
- Intermediate: Players who have an understanding of the weapons moveset, can hit about half of their counters, and can clear quests reliably within 8-15 minutes.
- Advanced: Players who can target and hit parts at will, formulate and change their gameplan, hit most of their counters, have good spatial awareness and usually clear without carting within 6-8 minutes.
- Expert: Players who have good understanding of the moveset, nail nearly all of their counters, have great positioning and gauge/amp upkeep and usually clear any quest within 4-6 minutes. In addition, they have a good general grasp of most monster’s movesets.
Many high caliber players expressed concerns and questionable design choices with Wilds’ iteration of Switch Axe. While “new game bad, previous game better, hope next goes back to the roots” is a tale as old as time, the exorbitant centralization of a move like Full Release Slash is new.
As a guide writer, I am happy at how quick and easy that makes it for me - As a Swaxe main and Runner, it takes away from the fun and skill expression quite a bit.
That being said however, there is still a lot of room for experimentation and a large Toolkit for intentionally playing suboptimally, which may come in handy should Full Release get “adjusted downwards”.